


Apple recently released WatchKit for use by developers as part of its beta program. This is the first general release that lets people get their hands on the tools for making apps for Apple Watch, and connecting them to their existing iPhone apps. If you haven’t done so already, I would highly recommend watching the “Getting Started with WatchKit” video on that same page.
This Tutorial
In this tutorial, we will be creating a simple To-Do app where a user can add tasks on an iPhone app, and view and complete them on the Watch. This will give you a solid starting point to create your own iPhone + Watch app that shares data between the two devices.
Prerequisites
To begin development of a WatchKit app, you will need to download and install Xcode 6.2 Beta. With this, you will have, among other things, and iOS 8.2 Beta simulator, and Apple Watch simulator. You must have Mac OS X 10.9.4 or 10.10 installed to use Xcode 6.2.
This post also assumes that you are familiar with developing an iOS application.
Introduction to WatchKit
Apple has separated Watch apps into three different types of views for the user: the app, Glances, and Notifications. Each of these have their own use and purpose, which Apple is being very deliberate about. When a user downloads your iOS app, if they have a Watch paired with their device, they will be prompted to also install your Watch app as well. This will install only the Storyboard and resources, while the code that backs it is executed on the iOS app to handle the user interface and interaction.
Watch Apps
[INCLUDE IMAGE OF APP]
At minimum, you are required to create an app when you distribute to Apple Watch. While you may be thinking, “of course I do”, when you dive deeper into the power of Glances and Notifications, you may not be so quick to make that judgement.
Apps are divided into two types: hierarchical and page-based. You must make the decision to use one or the other, and you cannot mix the two. This sounds limiting, but it creates uniformity across the device and lets users naturally interact with their Watch. When you consider the real estate of the screen, this is much more important than it seems at first glance.
Hierarchical apps are basically what you are used to when developing an iOS app with a UINavigationController. Users navigate “down” into your app, and then come back “up”, making it more suitable for a complex app. If you’ve written an iOS app, you should be familiar with this type.
Page-based apps are similar to a paginated UIScrollView. This type lets users horizontally swipe through a set of pages that display information to the end-user.
Glances
A Glance is meant to provide your users a quick overview of information that is current and relevant to your app. These are template-based views that strictly provide information, and cannot be directly interacted with — tapping on one will open your Watch app. It is not required for your app to include a Glance, but doing so can give a higher degree of exposure to it by means of users including yours in their Glance collection.
Notifications
Another optional addition to your Watch app is Notifications, which give you another avenue for displaying current information to your users. The difference between a Notification and a Glance is that your iOS app will determine when a Notification is shown, whereas a Glance can only be pulled up by the user. Because Notifications are shown at your discretion, you will want to take care to not overwhelm the user with unnecessary disruptions.
Notifications come in two flavors — Short Look and Long Look. A Short Look is displayed initially when the notification is first received, which will then transition to a Long Look if the Watch wearer’s wrist remains raised, or the Short Look is tapped. Short Looks are template-based, containing the app icon, name, and brief text. Long Looks can be customized within certain constraints.
Writing a Watch App
Project Setup
We will begin by creating a standard iOS application using Xcode 6.2 beta. Begin by starting a new iOS project. Don’t worry that you don’t see anything about Watch during this step — you’ll add the WatchKit extension in just a moment.
After you’ve created the project, you will need to add a new target in order to create the Watch app. You can do so by going to, from the menu, Editor -> “Add Target…”, and then selecting “Watch App” from the “Apple Watch” category.

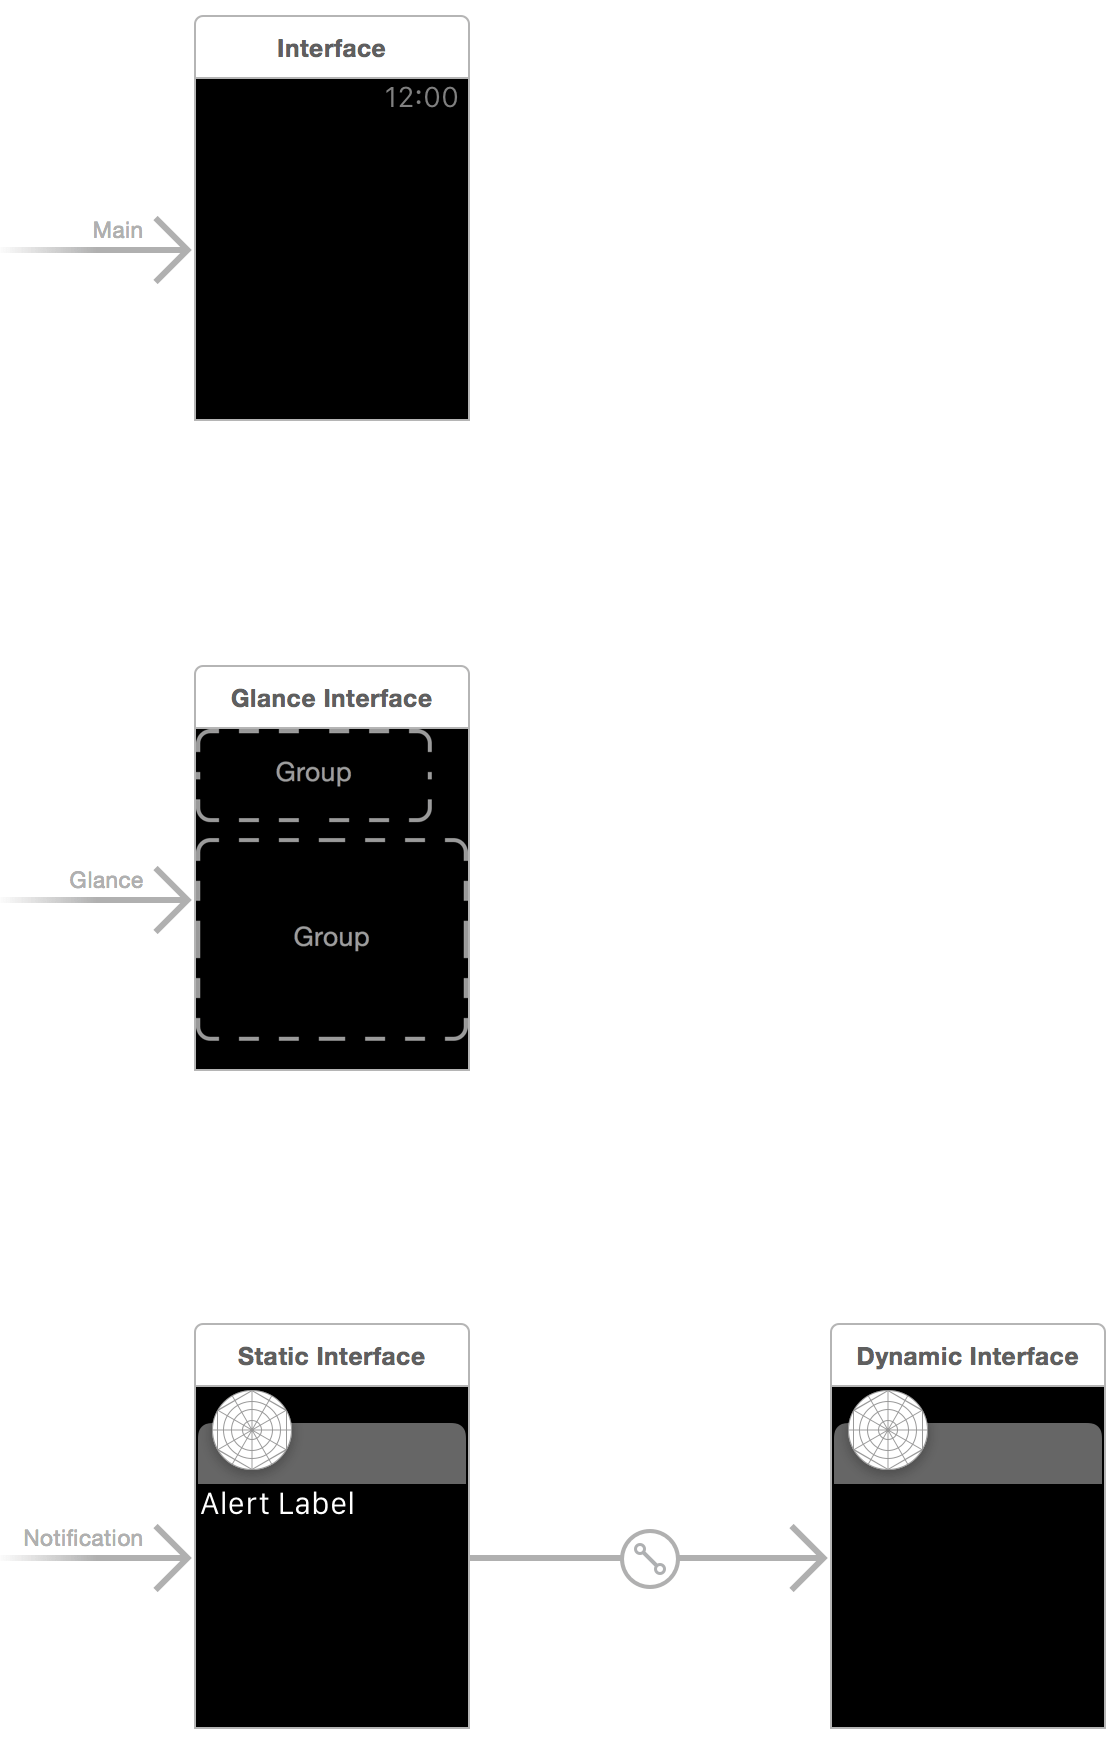
In the next screen, be sure to select “Include Notification Scene” and “Include Glance Scene”. After finishing, you will see two new groups in your project navigator. In the “WatchKit Extension” group, we were given files for the main app interface, the Notification view, and the Glance view.

In the “Watch App” group, Xcode generates a new Storyboard file that has entry points for “Main”, “Glance”, and “Notifications”.
Finally, you will need to enable “App Groups” in your app and WatchKit Extension target. As a simple storage mechanism, I will be using NSUserDefaults to persist the tasks, and we can utilize an App Group to share this data between the iPhone app and the WatchKit code. The reason you can’t simply use the [NSUserDefaults standardDefaults] is that the two targets will be executed “independent” of one another (that is a simplified description), and don’t share the same data. When enabling your App Group, you will be required to create one that has the prefix “group.” on it. Choose whatever you’d like — I chose “group.WatchKit-Demo”.

Be sure that you have set this for both your iPhone app target, and your WatchKit Extension target.
We can now begin writing our app with WatchKit.
iPhone Application
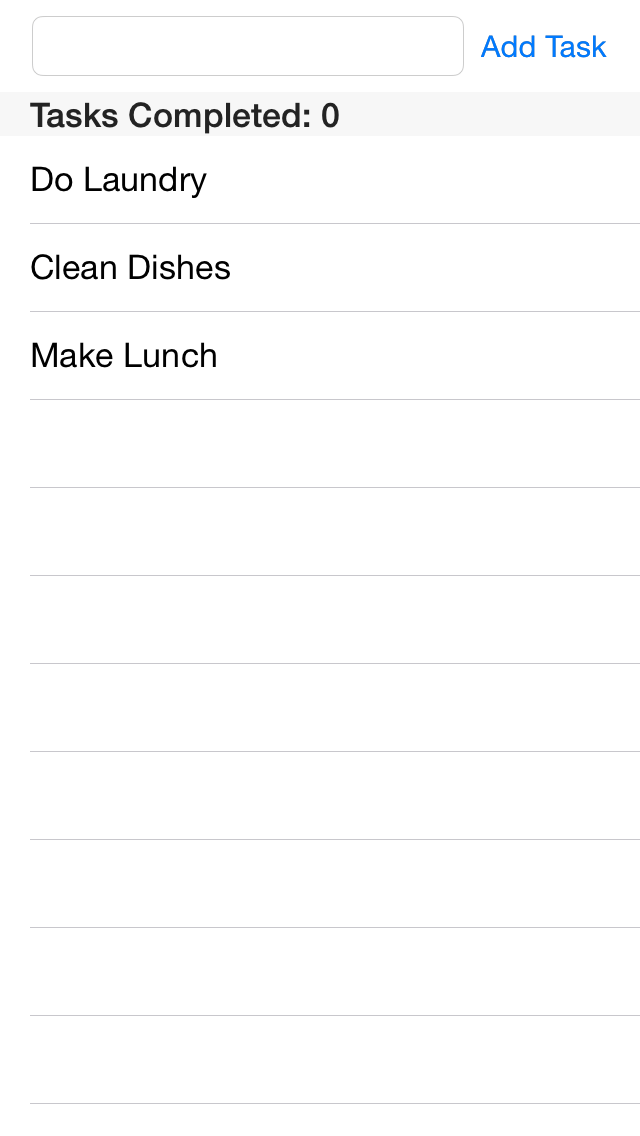
Because the focus of this tutorial is using WatchKit, I will not go into great detail about the setup of the iPhone portion of the app that controls the creation and display of tasks from the phone. The interface consists of a UITextField for adding the task’s text, a UIButton to add the task, and a UITableView to display the incomplete tasks.

My AppDelegate handles managing the tasks and keeping track of how many have been completed. When a task is added or completed, the AppDelegate posts a notification using the NSNotificationCenter to let the iPhone interface know to update the UITableView, as well as let the WatchKit extension act.
#import <UIKit/UIKit.h>

#define TASKS_UD_KEY           @"tasks"
#define TASKS_COMPLETED_UD_KEY @"tasksCompleted"
#define TASKS_UPDATED          @"tasksUpdated"
#define APP_GROUP_NAME         @"group.WatchKit-Demo" // The same name that you used when setting up your App Group

@interface AppDelegate : UIResponder <UIApplicationDelegate>

@property (strong, nonatomic) UIWindow *window;
@property (strong, nonatomic) NSMutableArray *tasks;
@property (assign, nonatomic) NSInteger tasksCompleted;

- (void)addTask:(NSString *)task;
- (void)completeTask:(NSInteger)taskId;

@end
#import "AppDelegate.h"

@interface AppDelegate ()

@property (strong, nonatomic) NSUserDefaults *userDefaults;

@end

@implementation AppDelegate


- (BOOL)application:(UIApplication *)application didFinishLaunchingWithOptions:(NSDictionary *)launchOptions {
    self.userDefaults = [[NSUserDefaults alloc] initWithSuiteName:APP_GROUP_NAME];
    [self loadTasks];

    return YES;
}

- (void)loadTasks {
    // Load the tasks from NSUserDefaults that we are sharing
    self.tasks = [[self.userDefaults objectForKey:TASKS_UD_KEY] mutableCopy];
    if(!self.tasks) self.tasks = [NSMutableArray new];
    self.tasksCompleted = [[self.userDefaults objectForKey:TASKS_COMPLETED_UD_KEY] integerValue];
}

- (void)addTask:(NSString *)task {
    [self.tasks addObject:task];
    [self saveTasks];
}

- (void)completeTask:(NSInteger)taskId {
    [self.tasks removeObjectAtIndex:taskId];
    self.tasksCompleted++;
    [self saveTasks];
}

- (void)saveTasks {
    // Save the tasks back to our shared user defaults
    [self.userDefaults setObject:self.tasks forKey:TASKS_UD_KEY];
    [self.userDefaults setObject:[NSNumber numberWithInteger:self.tasksCompleted] forKey:TASKS_COMPLETED_UD_KEY];
    [self.userDefaults synchronize];

    [[NSNotificationCenter defaultCenter] postNotificationName:TASKS_UPDATED
                                                        object:nil];
}

@end
#import <UIKit/UIKit.h>

@interface ViewController : UIViewController <UITableViewDataSource>

@end
#import "ViewController.h"
#import "AppDelegate.h"

@interface ViewController ()

@property (weak, nonatomic) IBOutlet UITextField *textField;
@property (weak, nonatomic) IBOutlet UITableView *tableView;

@property (weak, nonatomic) AppDelegate *appDelegate;

@end

@implementation ViewController

//----------------------------------------------------
#pragma mark - View setup
//----------------------------------------------------
- (void)viewDidLoad {
    [super viewDidLoad];

    [[UIApplication sharedApplication] setStatusBarHidden:YES];

    self.appDelegate = [UIApplication sharedApplication].delegate;

    [self registerForNotifications];
}

- (void)dealloc {
    [self deregisterForNotifications];
}

- (void)registerForNotifications {
    [[NSNotificationCenter defaultCenter] addObserver:self
                                             selector:@selector(tasksUpdated:)
                                                 name:TASKS_UPDATED
                                               object:nil];
}

- (void)deregisterForNotifications {
    [[NSNotificationCenter defaultCenter] removeObserver:self
                                                    name:TASKS_UPDATED
                                                  object:nil];
}

- (BOOL)prefersStatusBarHidden {
    return YES;
}

//----------------------------------------------------
#pragma mark - UITableViewDataSource methods
//----------------------------------------------------

- (NSInteger)tableView:(UITableView *)tableView numberOfRowsInSection:(NSInteger)section {
    return self.appDelegate.tasks.count;
}

- (UITableViewCell *)tableView:(UITableView *)tableView cellForRowAtIndexPath:(NSIndexPath *)indexPath {
    static NSString *CellIdentifier = @"taskCell";

    UITableViewCell *cell = [tableView dequeueReusableCellWithIdentifier:CellIdentifier];
    if(!cell) {
        cell = [[UITableViewCell alloc] initWithStyle:UITableViewCellStyleDefault reuseIdentifier:CellIdentifier];
    }

    cell.textLabel.text = [self.appDelegate.tasks objectAtIndex:indexPath.row];

    return cell;
}

- (NSString *)tableView:(UITableView *)tableView titleForHeaderInSection:(NSInteger)section {
    static NSString *titleFormatString = @"Tasks Completed: %d";
    return [NSString stringWithFormat:titleFormatString, self.appDelegate.tasksCompleted];
}

//----------------------------------------------------
#pragma mark - User Interaction methods
//----------------------------------------------------

- (IBAction)addButtonTapped:(id)sender {
    NSString *task = [self.textField.text stringByTrimmingCharactersInSet:[NSCharacterSet whitespaceAndNewlineCharacterSet]];
    if(task.length > 0) {
        [self.appDelegate addTask:task];
    }
    self.textField.text = @"";
}

//----------------------------------------------------
#pragma mark - Handling notifications
//----------------------------------------------------
- (void)tasksUpdated:(NSNotification *)notification {
    [self.tableView reloadData];
}

@end
Watch Interface
For our main Watch interface, we are going to display a list of tasks that have not been completed.


0 Comments